Why Add Google Login to Your PHP Application?
Adding Google Login (also called "Sign in with Google") to your PHP app is one of the easiest ways to provide secure, fast authentication.Users don't need to create new accounts—they simply use their existing Google credentials. This approach:
- Reduces friction during sign-up and login
- Boosts conversion rates
- Leverages Google's robust security features
Fewer password-related support tickets • Higher user trust • Faster onboarding

Table Of Content
1 Prerequisites
- PHP 8.0+ (recommended; works with 7.4+)
- Composer installed
- A Google account
- Local server (e.g., XAMPP, Laravel Valet, or PHP built-in server)
2 What This Tutorial Covers
In this updated tutorial, we'll use the official Google API Client Library for PHP to implement server-side Google OAuth 2.0 authentication.
Key features of this implementation:
- No database required (ideal for quick prototypes or simple apps)
- User information stored securely in PHP sessions
- Follows current Google OAuth 2.0 best practices (as of 2026)
This method is straightforward, production-ready with minor enhancements (like adding HTTPS and token validation), and remains fully supported using the official library (latest version ~2.19.0).
3 Create Project Folder "google-login-app"
4 Install Google Client Library
Use the following command to install Google Client Library via Composer.
composer require google/apiclient:^2.0
5 Create Google API Console Project
5.1 Login into Google Developer Account
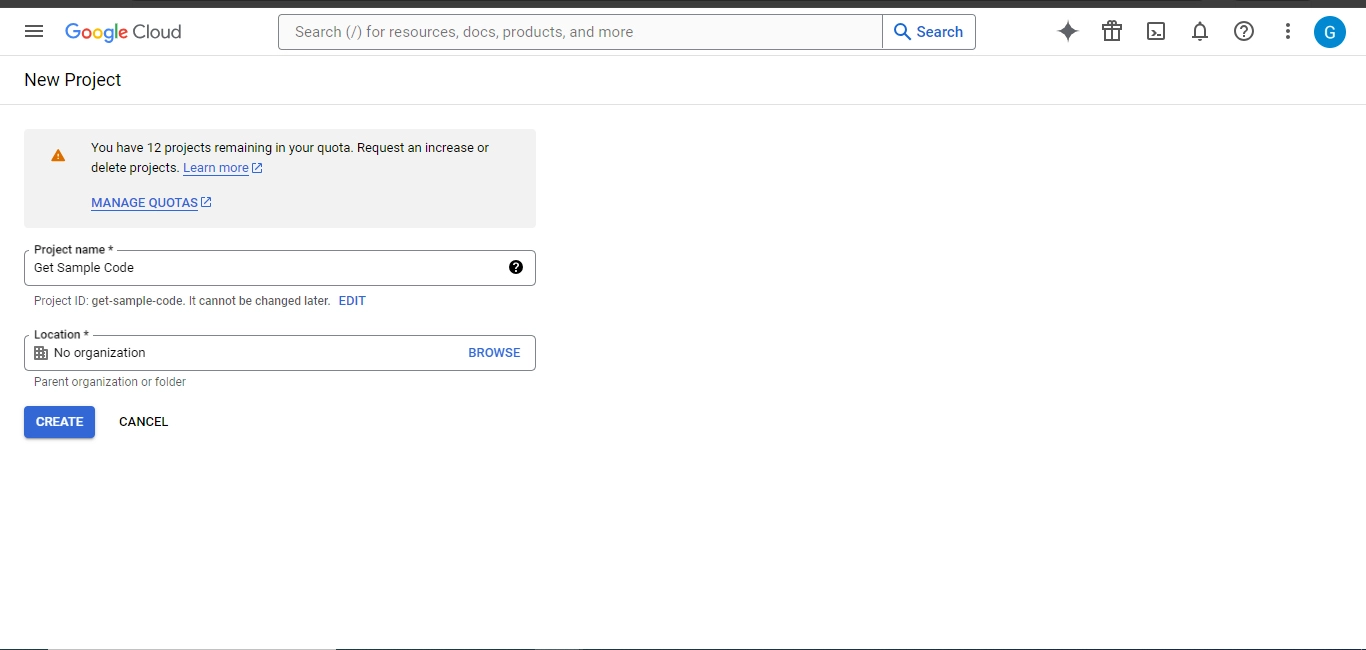
5.2 Create New Project
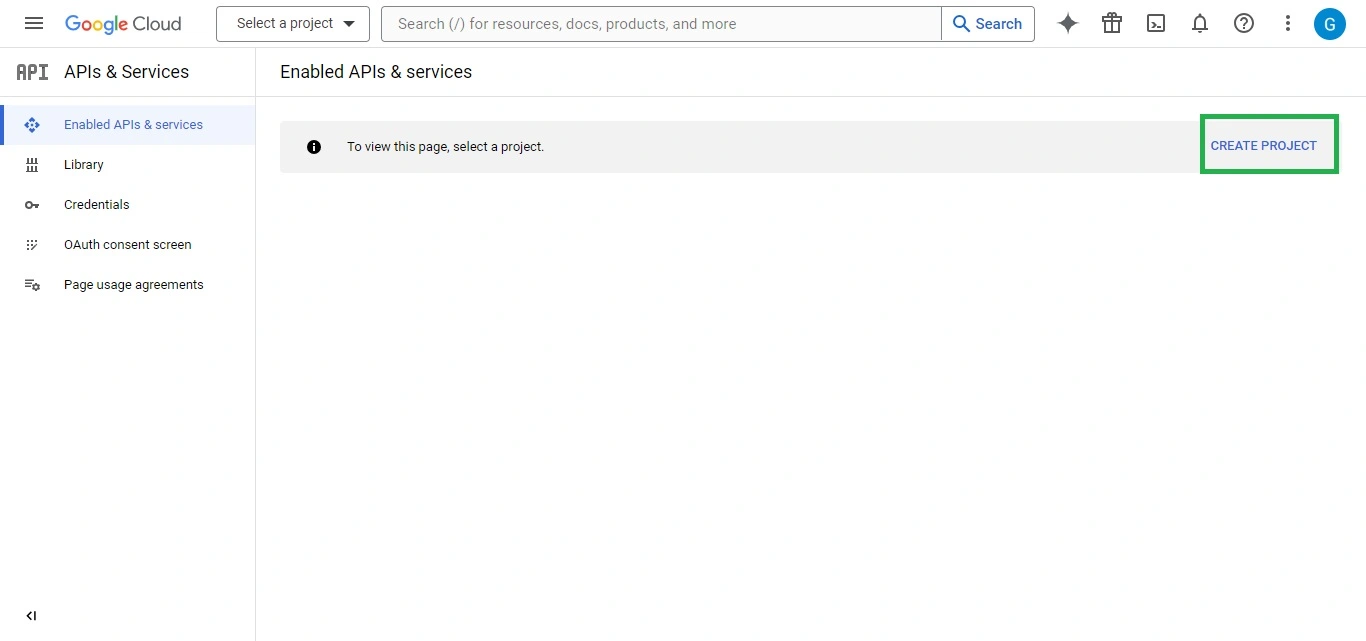

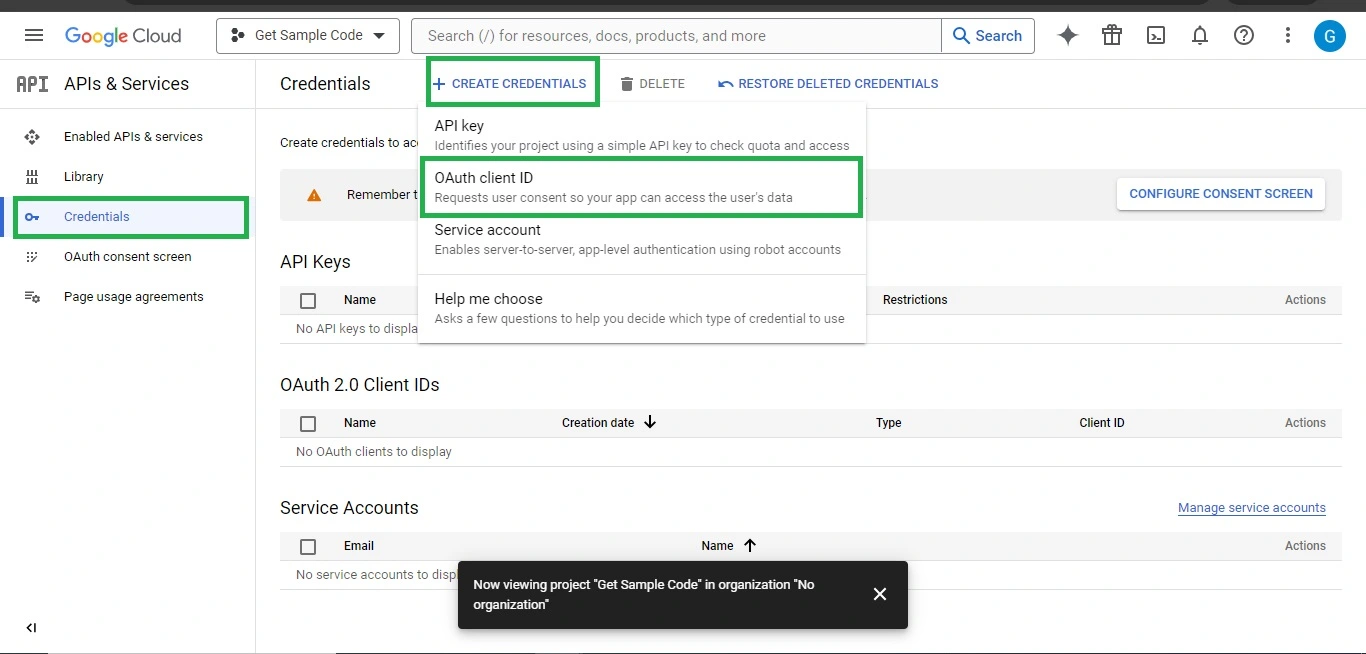
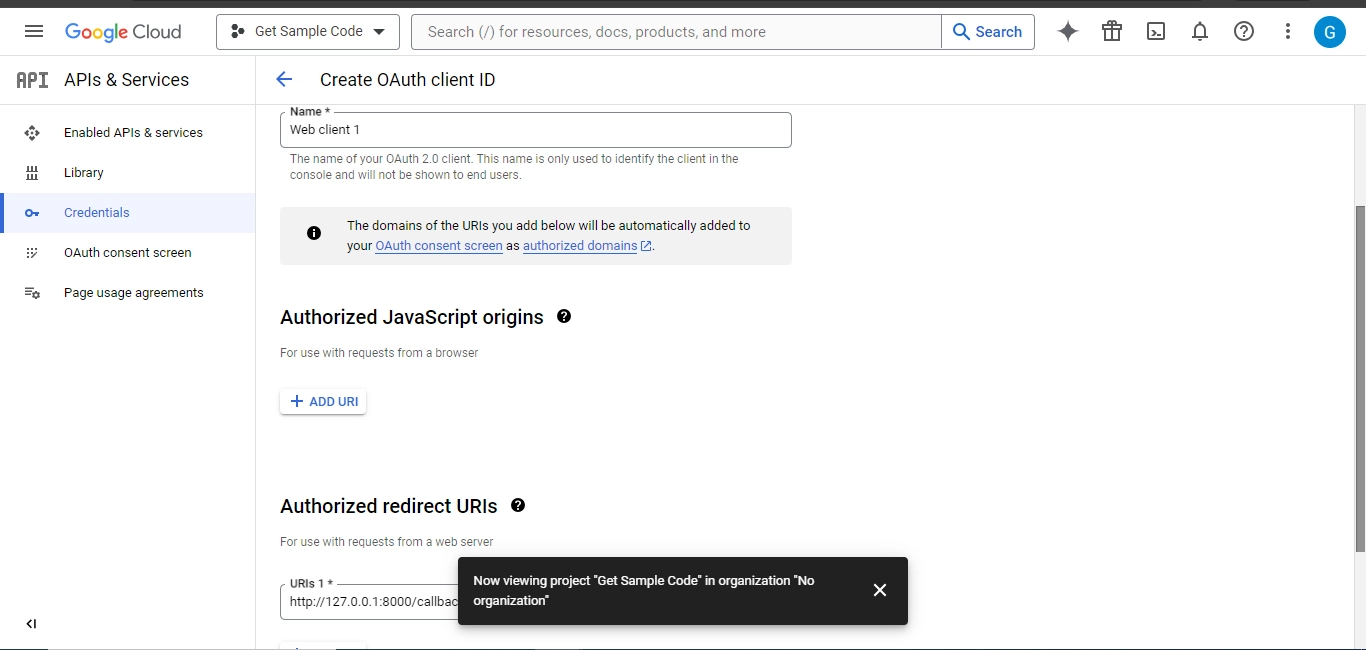
5.3 Create Credentials
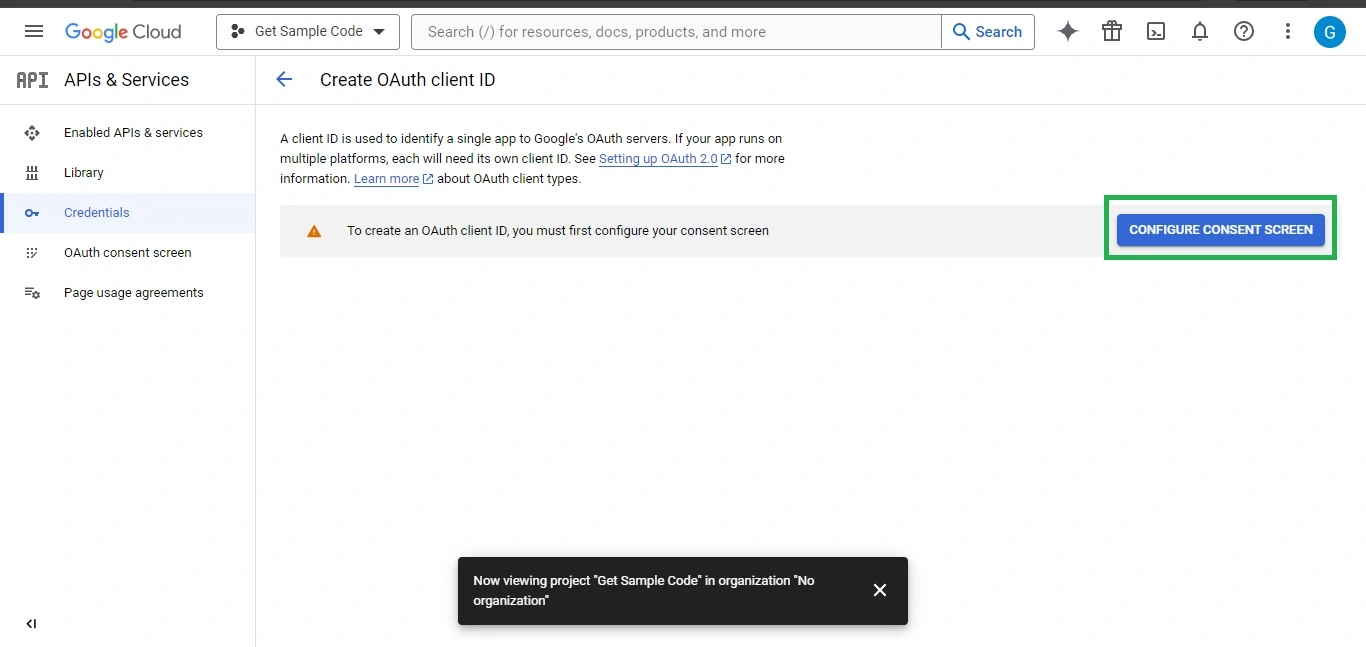
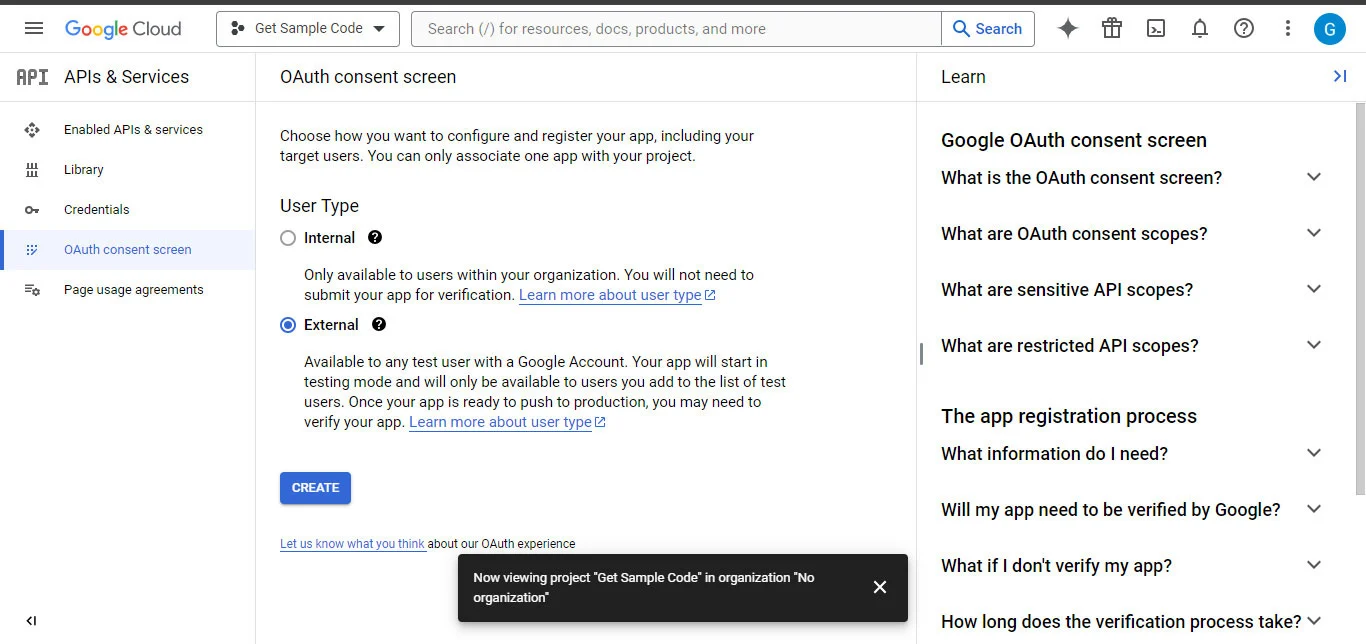
5.4 Configure Consent Screen
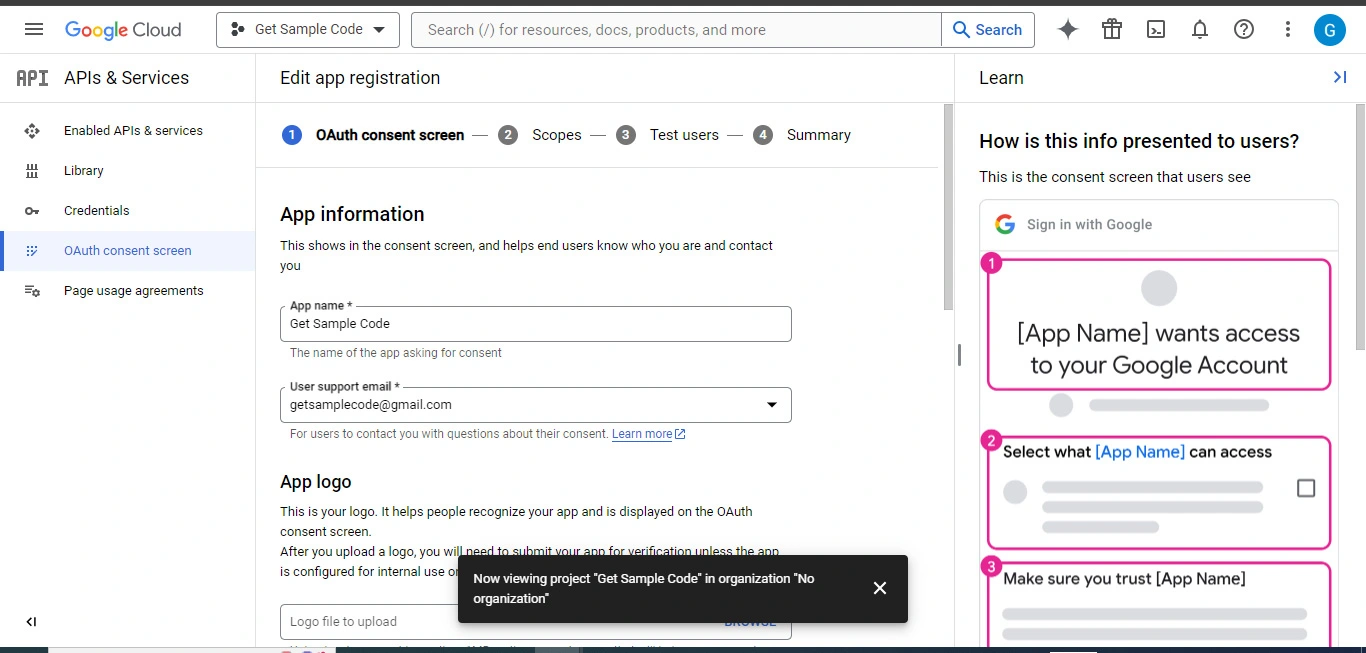
5.5 Update App Information
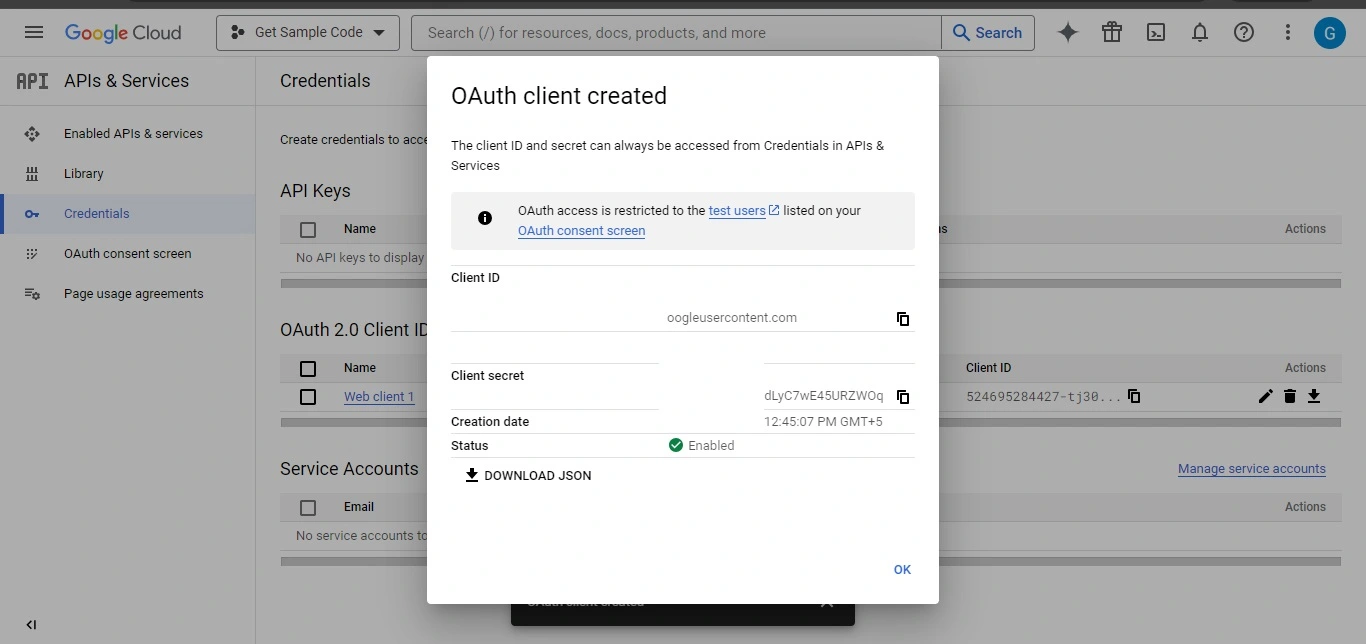
5.6 OAuth Client Created
6 Configure Google App Credentials(config.php)
<?php
// config.php - NEVER commit this file to Git in production!

define('GOOGLE_CLIENT_ID',     'YOUR_CLIENT_ID_HERE.apps.googleusercontent.com');
define('GOOGLE_CLIENT_SECRET', 'YOUR_CLIENT_SECRET_HERE');
define('GOOGLE_REDIRECT_URI',  'http://localhost/google-login-php/google-callback.php');

// Optional: for production, use .env file or environment variables instead
7 Create Login Page - login.php
<?php
// login.php
require_once 'vendor/autoload.php';
require_once 'config.php';

$client = new Google_Client();
$client->setClientId(GOOGLE_CLIENT_ID);
$client->setClientSecret(GOOGLE_CLIENT_SECRET);
$client->setRedirectUri(GOOGLE_REDIRECT_URI);
$client->addScope(['email', 'profile']);

$authUrl = $client->createAuthUrl();
?>
<!DOCTYPE html>
<html lang="en">
<head>
    <meta charset="UTF-8">
    <meta name="viewport" content="width=device-width, initial-scale=1.0">
    <title>Login with Google - PHP Demo</title>
    <style>
        body { font-family: Arial, sans-serif; text-align: center; padding: 80px 20px; background: #f4f4f4; }
        h1 { color: #333; }
        .google-btn {
            display: inline-block;
            background: #4285F4;
            color: white;
            padding: 14px 28px;
            border-radius: 4px;
            text-decoration: none;
            font-size: 18px;
            font-weight: bold;
            margin-top: 20px;
        }
        .google-btn:hover { background: #3267D6; }
    </style>
</head>
<body>
    <h1>Welcome! Sign in with Google</h1>
    <p>Use your Google account to log in securely — no new password needed.</p>
    <a href="<?= htmlspecialchars($authUrl) ?>" class="google-btn">Login with Google</a>
</body>
</html>
8 Create Google Callback Page - google-callback.php (Handles Google response)
<?php
// google-callback.php
session_start();
require_once 'vendor/autoload.php';
require_once 'config.php';

$client = new Google_Client();
$client->setClientId(GOOGLE_CLIENT_ID);
$client->setClientSecret(GOOGLE_CLIENT_SECRET);
$client->setRedirectUri(GOOGLE_REDIRECT_URI);

if (isset($_GET['code'])) {
    try {
        $token = $client->fetchAccessTokenWithAuthCode($_GET['code']);
        if (isset($token['error'])) {
            throw new Exception($token['error_description']);
        }

        $client->setAccessToken($token);

        $googleService = new Google_Service_Oauth2($client);
        $userInfo = $googleService->userinfo->get();

        // Store minimal user data in session (in production: save to database, check for existing user, etc.)
        $_SESSION['google_id']   = $userInfo->id;
        $_SESSION['email']       = $userInfo->email;
        $_SESSION['name']        = $userInfo->name;
        $_SESSION['picture']     = $userInfo->picture ?? '';

        header('Location: dashboard.php');
        exit;
    } catch (Exception $e) {
        echo "Error during authentication: " . htmlspecialchars($e->getMessage());
        echo '<br><a href="login.php">Back to login</a>';
        exit;
    }
} else {
    // No code → error or direct access
    echo "Authentication failed or access denied.";
    echo '<br><a href="login.php">Try again</a>';
}
9 Create Dashboard - dashboard.php
<?php
// dashboard.php
session_start();

if (!isset($_SESSION['google_id'])) {
    header('Location: login.php');
    exit;
}
?>
<!DOCTYPE html>
<html lang="en">
<head>
    <meta charset="UTF-8">
    <meta name="viewport" content="width=device-width, initial-scale=1.0">
    <title>Dashboard - Logged In</title>
    <style>
        body { font-family: Arial, sans-serif; max-width: 600px; margin: 40px auto; padding: 20px; background: #fff; border-radius: 8px; box-shadow: 0 2px 10px rgba(0,0,0,0.1); }
        img { border-radius: 50%; margin: 20px 0; }
        a { color: #d32f2f; text-decoration: none; font-weight: bold; }
    </style>
</head>
<body>
    <h1>Hello, <?= htmlspecialchars($_SESSION['name'] ?? 'User') ?>!</h1>

    <p><strong>Email:</strong> <?= htmlspecialchars($_SESSION['email']) ?></p>
    <p><strong>Google ID:</strong> <?= htmlspecialchars($_SESSION['google_id']) ?></p>

    <?php if (!empty($_SESSION['picture'])): ?>
        <img src="<?= htmlspecialchars($_SESSION['picture']) ?>" alt="Profile Picture" width="120" height="120">
    <?php endif; ?>

    <p><a href="logout.php">Logout</a></p>
</body>
</html>
10 Implement Logout Functionality
<?php
// logout.php
session_start();
session_destroy();
header('Location: login.php');
exit;
11 Folder Structure
12 Run Web Server to Test the App
- Start your local server:
XAMPP / WAMP → start Apache
Or command line: php -S localhost:8000 - Visit: http://localhost/google-login-php/login.php (adjust port/folder)
- Click "Login with Google" → approve → see your details on dashboard.
- Redirect URI mismatch: Ensure the URI in code matches Google Console exactly (including http/https, trailing slash, port).
- Invalid grant: Refresh token issues—usually caused by reusing old codes.
- Production tips: Use HTTPS, store tokens securely, add database integration for persistent logins, consider revocation on logout.
13 Conclusion

Written by Revathi M
PHP Developer & Technical Writer · 10+ years building web applications with CodeIgniter and Laravel
Revathi specializes in PHP backend development, authentication systems, and REST API design. She writes practical, production-tested tutorials at Get Sample Code to help developers build secure applications faster.
Frequently Asked Questions
You need PHP 7.4 or higher, along with Composer installed.
Run the command: composer require google/apiclient:^2.0. This installs the official Google API Client Library for PHP.
Go to console.developers.google.com, create a project, configure the OAuth consent screen (External), create OAuth Client ID credentials, and add your redirect URI (e.g., http://localhost/.../google-callback.php).
The tutorial requests 'email' and 'profile' scopes using $client->addScope('email'); and $client->addScope('profile');.
Create a Google_Client instance, set Client ID, Secret, Redirect URI, add scopes, then use $client->createAuthUrl() to get the login URL.
In google-callback.php, fetch the access token with $client->fetchAccessTokenWithAuthCode($_GET['code']), set it, then use Google_Service_Oauth2 to get user info via $oauth2->userinfo->get().
The tutorial fetches Google ID ($userInfo->id), name ($userInfo->name), and email ($userInfo->email), then stores them in session.
No, user data is stored only in PHP sessions ($_SESSION). No database is used.
The redirect URI in your code (GOOGLE_REDIRECT_URI) must exactly match the one configured in Google Console OAuth credentials. Include the full URL including the callback file.
In logout.php, call session_destroy() and redirect to the login page. This clears the session but does not revoke the Google access token.